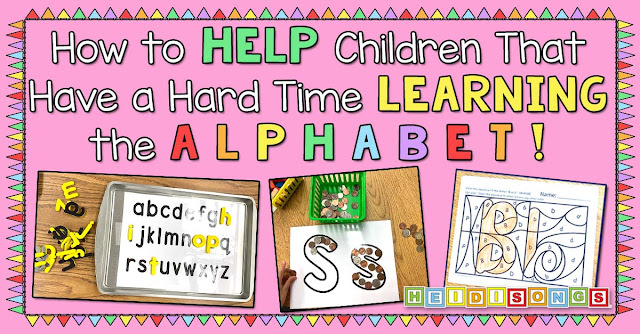
Teaching First Graders to Write an Insect Report!
Have you ever wondered if there is a relatively easy way to teach children to write their first report? Well, YES- I believe that there is! Scaffolding the process is the key. If each step is taught and each paragraph written one day at a time, then the whole process becomes much easier. Also, it's far less daunting of a task for reluctant workers when it is broken down into manageable chunks. I can't wait to tell you how we did it!

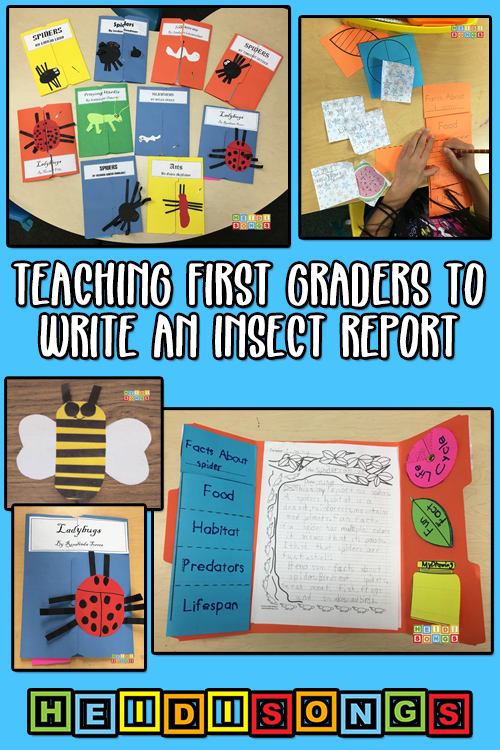
During the last few weeks, we have been working on writing reports in my first and second grade combination class. The first graders did an insect report, and the second graders did a biography report on a famous person. I'll be telling you about the biography report in an upcoming post. For today, I'll focus on the insect report. I designed this Insect Report to be displayed at our upcoming Open House, which is a HUGE deal here in California!

Because of the need to display the report, I decided to turn the report into a "Lapbook," which is a pretty graphic organizer made with foldables which are glued onto a file folder. A lapbook doesn't always have the report glued into the middle of it, but I decided that that was where I wanted mine to go!

Teaching the Kids to Write the Report
Day One: Practice Writing a Report Together on a Single Topic
The first thing we did was try to write a practice report together, all on the very same insect. So I read a nonfiction book to them, and then we searched for the information needed in the book: the habitat, food, predators, lifespan, life cycle, and a fun fact. Then they wrote along with me as I wrote under the document camera.
As we were writing, I kept explaining that I was getting the information from the book that I was reading. I tried hard to think aloud when I was putting in capital letters and punctuation, and explain why when I wrote one. I had the children raise their hands and offer words and sentences as much as possible. I also had them read aloud with me as much as possible.
Day Two: Find and Read Books on Insects
On the second day, I passed out all of the nonfiction books that I had on insects, and wrote on the board the list of facts that they needed to find (the habitat, food, predators, lifespan, life cycle, and a fun fact.) Unfortunately, I didn't quite have enough books at the right reading level for everyone, and some of them had to do their reports on spiders, even though spiders aren't really insects. (I was disappointed about it, but the kids sure weren't!)

I gave the children each a few sticky notes and had them find the facts in their books, and then write those facts on the sticky notes, leaving them on the pages where the found those facts. Several of the children couldn't find all of the information in their books, so we had to search online or in other books. I personally helped each of them search online for the information that was needed, but luckily it didn't take very long! I gave each child a gallon zip bag with their name on it to keep their book and supplies in, because some of the sticky notes were already falling off and we didn't want them to get lost. Also, I knew that the bags could also hold those lapbook pieces as they were being cut out and written on! I HIGHLY recommend this! I collected the zip bags, books and everything in them daily. I figured this out after the first two days, when children had lost quite a few things and then either had to start over or spend a LONG time searching!

Day Three: Write the Information on the Graphic Organizers
Most of the children finished finding all of the information from the books on day two, so I allowed them all to move on to the next step the following day. I gave them the pieces from the lapbooks that they would need to write out the information on, and had them begin forming complete sentences on them, and then putting the pieces into my zip bag. Again, I modeled this completely before they started.

Just a side note: a couple of the children forgot to write complete sentences, and I was able to catch them before they did too many and had them erase and restart. However, one of them had finished nearly the whole thing with just sentence fragments, and was so discouraged that I just couldn't make him redo the whole thing, so I let it go. It is much easier to have the children write complete sentences on the graphic organizer pieces first- because then after that, all they have to do to write their report is recopy those complete sentences! Easy peasy! However, that just doesn't work unless you can get them to start by writing complete sentences.

Day Four: Give the Slower Workers a Day to Catch Up
I think it is MUCH easier to plan something fun and/or enriching for my faster workers to do while I help my slower workers catch up! So I let my faster workers have little extra iPad or reading time on this day while I helped my slower ones catch up. That way, when it is time to begin writing the report, the children can all be ready for those instructions on the same day.
Day Five: Begin Writing the Report
The following day we started writing our report. I gave them an outline to follow so that they would know what facts to write about, and when. (This outline is included in the freebie packet. Again, I modeled the entire thing before passing it out.

My kids kept asking me how many sentences they had to write, and I kept telling them that they needed to write as many sentences it would take to include all of the information on their outline! This was not a happy answer for many of them, unfortunately, probably because the outline looked pretty long. If you have a lower functioning class, you may want to have them do the first paragraph on one day, and the second paragraph on the next.

Day Six: Finish Writing the Report and Begin Putting the Lapbook Together
Half of my first graders finished writing their reports in one day, and the others needed a second day. My rule was that NOBODY could begin putting the lapbook together or decorating it with markers until the entire report was written. Of course a few of them tried to do things in reverse order, because you know, they're kids! But I managed to correct that right away so no harm done.

Note: Be sure to tell the children to be very CAREFUL when cutting out the lifecycle circle! They should cut AROUND the black dot in the middle rather than cut it off, or there will be nothing to attach the paper fastener to!

Day Seven: Finish Putting the Lapbook Together and Make Construction Paper Insects
The children that were early finishers got to spend some time with the markers tracing over the dotted line captions on the lapbook, and then started the construction paper insect for the cover. The rest of the children worked on finishing their report, with my help.

Day Eight: Make Construction Paper Insects and Type Titles for Cover
The children each had a construction paper insect to make, and they actually did this with a very nice retired teacher who volunteers in my classroom. She helped each and every one of them make a cute insect for the cover! This would probably be much more manageable if you have the kids stick to just four or five insects of your choice. Then you could only let them choose things that you already know you have projects for, etc. You will find free downloadable patterns for the following projects on my blog at these links, (but be careful of the sizes- they might not fit the lapbooks!)

ladybug

bee

ant

caterpillar

butterfly

I don't have a template for the spiders, but here is a break down of the dimensions:
Body: 3 x 3 square with corners cut off
Head: 1 x 1 square with corners cut off
Legs: .5 x 2
Eyes: .5 x .5

Then later, when the children were working independently at the computer lab, I showed each of them how to type the title of their report into Word and then choose a font. They also typed their names into it as the author of the report, and then printed it out! This worked well as as a way to meet our Common Core standard of publishing something by using digital tools.


I hope that you will enjoy using this report template, and that this method of teaching it will make it easier for you! Do you have another way of teaching this? I would love to hear it!
Thanks!
Heidi :)
----------------------------------
Follow me! Did you enjoy this post? Do me a favor and share it with your friends! And follow this blog by signing up for my email updates here, or follow on Bloglovin', or follow me on TPT! I'm also on Pinterest, Facebook, Twitter, Instagram, Google+ and YouTube, too! Don't forget to sign up for our email newsletter for special deals and promo codes that you won't find out about anywhere else.

During the last few weeks, we have been working on writing reports in my first and second grade combination class. The first graders did an insect report, and the second graders did a biography report on a famous person. I'll be telling you about the biography report in an upcoming post. For today, I'll focus on the insect report. I designed this Insect Report to be displayed at our upcoming Open House, which is a HUGE deal here in California!

Because of the need to display the report, I decided to turn the report into a "Lapbook," which is a pretty graphic organizer made with foldables which are glued onto a file folder. A lapbook doesn't always have the report glued into the middle of it, but I decided that that was where I wanted mine to go!

Teaching the Kids to Write the Report
Day One: Practice Writing a Report Together on a Single Topic
The first thing we did was try to write a practice report together, all on the very same insect. So I read a nonfiction book to them, and then we searched for the information needed in the book: the habitat, food, predators, lifespan, life cycle, and a fun fact. Then they wrote along with me as I wrote under the document camera.
As we were writing, I kept explaining that I was getting the information from the book that I was reading. I tried hard to think aloud when I was putting in capital letters and punctuation, and explain why when I wrote one. I had the children raise their hands and offer words and sentences as much as possible. I also had them read aloud with me as much as possible.
Day Two: Find and Read Books on Insects
On the second day, I passed out all of the nonfiction books that I had on insects, and wrote on the board the list of facts that they needed to find (the habitat, food, predators, lifespan, life cycle, and a fun fact.) Unfortunately, I didn't quite have enough books at the right reading level for everyone, and some of them had to do their reports on spiders, even though spiders aren't really insects. (I was disappointed about it, but the kids sure weren't!)

I gave the children each a few sticky notes and had them find the facts in their books, and then write those facts on the sticky notes, leaving them on the pages where the found those facts. Several of the children couldn't find all of the information in their books, so we had to search online or in other books. I personally helped each of them search online for the information that was needed, but luckily it didn't take very long! I gave each child a gallon zip bag with their name on it to keep their book and supplies in, because some of the sticky notes were already falling off and we didn't want them to get lost. Also, I knew that the bags could also hold those lapbook pieces as they were being cut out and written on! I HIGHLY recommend this! I collected the zip bags, books and everything in them daily. I figured this out after the first two days, when children had lost quite a few things and then either had to start over or spend a LONG time searching!

Day Three: Write the Information on the Graphic Organizers
Most of the children finished finding all of the information from the books on day two, so I allowed them all to move on to the next step the following day. I gave them the pieces from the lapbooks that they would need to write out the information on, and had them begin forming complete sentences on them, and then putting the pieces into my zip bag. Again, I modeled this completely before they started.

Just a side note: a couple of the children forgot to write complete sentences, and I was able to catch them before they did too many and had them erase and restart. However, one of them had finished nearly the whole thing with just sentence fragments, and was so discouraged that I just couldn't make him redo the whole thing, so I let it go. It is much easier to have the children write complete sentences on the graphic organizer pieces first- because then after that, all they have to do to write their report is recopy those complete sentences! Easy peasy! However, that just doesn't work unless you can get them to start by writing complete sentences.

Day Four: Give the Slower Workers a Day to Catch Up
I think it is MUCH easier to plan something fun and/or enriching for my faster workers to do while I help my slower workers catch up! So I let my faster workers have little extra iPad or reading time on this day while I helped my slower ones catch up. That way, when it is time to begin writing the report, the children can all be ready for those instructions on the same day.
Day Five: Begin Writing the Report
The following day we started writing our report. I gave them an outline to follow so that they would know what facts to write about, and when. (This outline is included in the freebie packet. Again, I modeled the entire thing before passing it out.

My kids kept asking me how many sentences they had to write, and I kept telling them that they needed to write as many sentences it would take to include all of the information on their outline! This was not a happy answer for many of them, unfortunately, probably because the outline looked pretty long. If you have a lower functioning class, you may want to have them do the first paragraph on one day, and the second paragraph on the next.

Day Six: Finish Writing the Report and Begin Putting the Lapbook Together
Half of my first graders finished writing their reports in one day, and the others needed a second day. My rule was that NOBODY could begin putting the lapbook together or decorating it with markers until the entire report was written. Of course a few of them tried to do things in reverse order, because you know, they're kids! But I managed to correct that right away so no harm done.

Note: Be sure to tell the children to be very CAREFUL when cutting out the lifecycle circle! They should cut AROUND the black dot in the middle rather than cut it off, or there will be nothing to attach the paper fastener to!

Day Seven: Finish Putting the Lapbook Together and Make Construction Paper Insects
The children that were early finishers got to spend some time with the markers tracing over the dotted line captions on the lapbook, and then started the construction paper insect for the cover. The rest of the children worked on finishing their report, with my help.

Day Eight: Make Construction Paper Insects and Type Titles for Cover
The children each had a construction paper insect to make, and they actually did this with a very nice retired teacher who volunteers in my classroom. She helped each and every one of them make a cute insect for the cover! This would probably be much more manageable if you have the kids stick to just four or five insects of your choice. Then you could only let them choose things that you already know you have projects for, etc. You will find free downloadable patterns for the following projects on my blog at these links, (but be careful of the sizes- they might not fit the lapbooks!)


I don't have a template for the spiders, but here is a break down of the dimensions:
Body: 3 x 3 square with corners cut off
Head: 1 x 1 square with corners cut off
Legs: .5 x 2
Eyes: .5 x .5

Then later, when the children were working independently at the computer lab, I showed each of them how to type the title of their report into Word and then choose a font. They also typed their names into it as the author of the report, and then printed it out! This worked well as as a way to meet our Common Core standard of publishing something by using digital tools.


I hope that you will enjoy using this report template, and that this method of teaching it will make it easier for you! Do you have another way of teaching this? I would love to hear it!
Thanks!
Heidi :)
----------------------------------
Follow me! Did you enjoy this post? Do me a favor and share it with your friends! And follow this blog by signing up for my email updates here, or follow on Bloglovin', or follow me on TPT! I'm also on Pinterest, Facebook, Twitter, Instagram, Google+ and YouTube, too! Don't forget to sign up for our email newsletter for special deals and promo codes that you won't find out about anywhere else.